Friday, May 7, 2010

Cold Frame!

Last night, I'm proud to say, I finished my cold frame. Well, almost. It still needs some foam around the top of the frame part so that way the seal is good when the door is closed.

But, this morning when I checked the closed frame, there was condensation on the inside of the glass! Condensation = heat (like on your bathroom mirror after you take a shower). This is great! Condensation even without a solid seal!

So here are the photos. I put in the tomato seedlings this morning. More on that a bit further down.

I used a really solid, double-paned, butt-heavy glass door. The heaviness helps the frame seal well, though I loathe the heaviness a bit. But, especially once I get the foam on there (tonight!), the seal will be excellent for keeping warmth in at night.


I used cedar fenceboards (again) and I stuffed plastic bags between them so that way the front and back were insulated well. I double-layered the wood for the two sides.


I'm going to leave the handle on the door. It makes it easy to lift, and it looks pretty nifty. I may paint the door... I haven't decided yet. Right now it's black. That's a nice color, but all the dust shows so easily. And I need to also remove the metal scraper at the bottom. It's just held on by screws, so that should be easy.
And here are the tomato seedlings, added to the frame this morning! I put netting over the top of the frame to keep out the stupid neighborhood/feral cats.

The second tray of seedlings. I'm hoping that with the direct sunlight (rather than the weak fluorescent bulbs) they will grow like weeds. Everything else in the garden is growing fast, and I need my tomatoes to hop to it!
I only propped the frame open a bit. It's supposed to get warmish today (68 degrees), but these seedlings are used to a warm laundry room. This will keep it non-roasting, but a little warmer than if the frame was wide open.

So, paint or no paint? Just the door? Or the sides too? Thoughts??

Thursday, May 6, 2010

In-season recipes: Spring Garlic

One thing I've noticed in the past year is how much of a disconnect a lot of people have with WHEN and WHERE their food comes from. This is not a criticism, it just shows how much things have changed. We have most foods available 365 days a year, so in the supermarket aisle, there are no seasons. Sure, the price may dip, but that could mean that tomatoes are in-season an abundance of tomatoes in Ecuador.

As I try to live more healthily, try more recipes, and eat things more locally, I've found that I've fallen into also eating things more in-season. Sure, I may chop up a few out-of-country items to go with those in-season vegetables, but hopefully that will change as I start putting some food away this summer.

And if I'm cooking those recipes, I thought I'd share. I expect there to be several failures, but hopefully a few successes. Like last night: Success. Oh my gosh, success.

Up to bat last night: Spring Garlic.Spring garlic is also known as baby garlic or green garlic. It's a true garlic plant, but it has not yet developed a bulb. It still smells and tastes like garlic, but it's much more mild a taste that pungent bulb garlic. This garlic was obtained last Saturday at the infamous Saturday Market. On a whim, I decided to give it a try. I'm glad I did.

Once I had the garlic, I had to figure out what the hey to make. I decided upon two dishes.

The first one was a fabulous success that makes me so giddy about anticipating serving this at summertime gettogethers that I could cry: Bruschetta.

I got the recipe from East Village Kitchen. It is incredibly simple.

INGREDIENTS:
4-5 tomatoes on the vine

1 bulb spring garlic, chopped finely

1 large handful of fresh basil, chopped

1 tablespoon olive oil

sea salt or kosher salt

fresh ground black pepper

1/2 loaf baguette, cut into 3/4 inch thick rounds


Mix together the tomato, garlic and basil, and let that mixture stay in a bowl in the fridge for approximately 2 hours. This will let the flavors really do wonderful things.


After 2 hours, preheat the oven to 400. Slice up your bread or baguette (I'll post the recipe for my fridge bread soon) into pieces no bigger than 2"x3". Since you're piling things onto the bread, you want easy-to-manage pieces. Place bread on cookie sheet (I put foil over the sheet, and that worked well).

Load those bread slices up with the tomato/garlic/basil mixture. Drizzle olive oil over the bread pieces, and then pepper and salt the bread pieces. Stick in the oven for about 10-15 minutes, until the bread is toasty but not hard-as-a-rock.

Attempt not to explode as you proceed to eat the entire tray. No joke. It's THAT GOOD.

***

The next dish I made was a soufflé. I got this recipe from the New York Times.

It was a, drumroll, Green Garlic and Chive Soufflé With Gruyère Cheese.

*DROOL*
INGREDIENTS:

5 tablespoons butter, more for pan

1 tablespoon grated Parmesan

2 fat bulbs green garlic, root and green parts trimmed, outer layer removed

1/4 cup flour

2 cups milk

2 sprigs thyme (I used whole thyme that I ground. I didn't have springs. This worked)

3/4 teaspoon kosher salt plus a pinch

1/4 teaspoon ground black pepper

1/8 teaspoon grated nutmeg

4 egg yolks and 6 egg whites

2/3 cup grated Gruyère cheese (you can find this for a non-gagable price at Costco)

1/4 cup chopped chives

Preheat oven to 400 degrees. Butter a 2-quart gratin dish (I used a nice cassarole dish) and sprinkle bottom and sides with Parmesan. Using a sharp knife or food processor, mince garlic.

Melt butter in a saucepan and let cook for 1 minute. Add flour and cook, whisking, until mixture is pale golden, about 5 minutes. Whisk in the milk and thyme sprigs, and continue to cook, whisking constantly, until mixture is thick and smooth, about 2 minutes longer.

Turn off heat and whisk in salt, pepper and nutmeg. Transfer to a large bowl and whisk in egg yolks, one at a time. Whisk in minced garlic, cheese and chives.

In a mixer, whip egg whites with a pinch of salt until they hold soft peaks. Using a spatula, fold a third of the whites into yolk mixture to lighten it, then fold in remaining whites, taking care not to overmix. As you fold, pluck out and discard thyme sprigs.

Spread mixture in prepared pan and smooth top. Bake until golden brown and puffed, 20 to 25 minutes.

Mine turned out a little runny, so I stuck it back in the oven. So, if yours is in a dish that causes it to be 2.5"-3" deep in the center, leave it in the oven for 30-35 minutes.

Both of these recipes are definitely going in the "repeat" pile.

Wednesday, May 5, 2010

Little lost freaky chick and new chairs

A neighbor (from like 5 houses over; I'd never met her) came up to me yesterday and asked if I'd lost a chick. She was holding a have-a-heart trap where she had placed a poor, approximately 5-week old chick. The little bird was friendly, but I guess she felt a trap was necessary so she didn't lose her. Having only black speckled chicks, I told her no, but then she asked if I could care for her. If the proper owner was found, then I'd obviously give the chick back. If not, then, well, I'd have a new chick!

I have no idea what type of chicken it is. Maybe a feathered black australorp? It looks a little freaky and intense. Last night, it escaped it's quarantine box in the laundry room, and I thought I'd lost her. Then, I looked up. There, perched on top the highest shelf, quietly glaring down at me, was this chick. Needless to say, the screen on top the box is now very much securely on.

I'm dubbing her KFC-- kooky freaking chick.
In other news, I've been on the hunt for a wood outdoor set. Problem? They're super crazy expensive. That's not something we're willing to spend a ton of cash on. Soooo....

Last weekend, when I was at the recycling place, I spotted these chairs. Now, they MAY be a tad ugly now, but stay with me as I describe my plans for them. And yes, the pergola is not done yet. It's been a bit unseasonably cold and wet. And yes, that's my awesome new fire pit I found on craigslist. For super super cheap. Total steal of a find.
Ok, so here's the chair. Note that it's solid wood. The various portions of the chair are also removable. the seat can come off, as can the back. I wanted chairs in the upright position, that way we could use the set for just hanging out AND for eating. It's hard to eat at a table when you're sitting in a lounger Adirondack chair. And, while I know I possess the knowledge to build my own chairs, I really don't have the complete set of tools or the time to do so.
So... imagine with me the following: remove the back rest on the above chair. Remove the seat portion. You're left with a bare frame, one that I can easily sand down so I can stain it all one uniform color. Now, put slats on the entire chair, a la the chair below:

And, imagine the entire chair with mahogany stain (the same color that the pergola happens to be stained).
Finally, one last detail. I picked up these awesome travertine tiles (they're approximately 1"x1" each). To jazz up the slats, I bought a chisel. So, a few seat slats will have inlaid tile on the ends, and I'm thinking that one of the slats on the back will have like three, centered in a row tiles. The color of the tile against the stain on the wood should look really pretty.

Here's a sample one I did. You can't really tell the final product because the wood is not stained, but you get the idea.

That's my project that's on the back burner right now. First up: covering all my plants, keeping the weeds down, and planting a few more seeds.

I should also note that I currently lack a table. As a result (and being unable to likely find a table that will match this style of chair), I'm currently examining a lot of different tables. I know how to make a table, but... I want to be careful and make one that is well-made and not rickety. I've found my best projects and designs come from careful examination of other tables. So, here's hoping!

Tuesday, May 4, 2010

Pea Trellis Tutorial

A number of you have requested I do a tutorial on how I built my pea trellises. So, as requested, here is the tutorial.

This is the finished product. It's pretty sturdy, and it will definitely do the trick for a few seasons (at least).
Materials you will need:
  • 3 cedar fence boards, 6' long (99cents each at Home Depot)
  • 6-8 long screws (2"-3.5")
  • 4 long screws (2.5-3.5") or 4 shorter screws (3/4"-1.25")
  • 8 short screws (about 3/4") or wood glue
  • Screwdriver (electric works best, though you could do this by hand)
  • Saw or a friend with a saw. :)
  • String
  • Outdoor staples with a spring staple gun, or staples to hammer in with a nail.

I like to use cedar fenceboards in most of my projects. Here's why:
  1. First off, they're sturdy.
  2. They will not decay as fast as other wood. These are the same boards that I use to make my garden beds (see picture, below).
  3. Their dimensions are easy to transport and work with: They are 6' long, 1/2-3/4" thick, and they are 5.5" wide.
  4. They BEND pretty well. No, not crazy bending, but enough that I can make something fit if need be.
  5. NO NEED TO PRE-DRILL ANY HOLES. That means I can screw in a screw, and generally, the wood will NOT split. This is a godsend, for if I had to pre-drill the holes first (if you pre-drill, wood will usually not split when you put in a screw), it would take SO much time.
Of course though, you can do this project with just about any type of wood. That's just my schpeal on why I chose what I chose.


For trellis work, the 5.5" wide boards were not the look I wanted. I wanted something thinner. Of course, you could easily leave the boards 5.5" wide.

Because I wanted something thinner, I split the boards length-wise. So, I ended up with 2.75" wide boards. I did this a few times using my hand-held jigsaw, but that's pretty awkward, the lines aren't straight, and it's kinda dangerous (because you're dealing with a long piece of wood that you're having to hold awkwardly while you're cutting).

If you don't have a saw, here's what you can do (if you want the thinner boards): either buy thinner boards (it will probably be a different type of wood), try to convince the hardware folks to cut the boards for you (they probably won't because it's such an awkward cut), OR:

Drill approximately a hole every 3" up the length of the board. Put the hole along the cut-line (the 2.75" width mark). Then attempt to break the board apart. Since the grain of the wood is length-wise, your drill holes should put enough weakness on those grains to make splitting possible.

As for me, I jigsawed my pea trellises. I have more trellises to build though, so I convinced a friend to let me use his table saw. So, this is what the final product will look like:
The final product, essentially, is a big sawhorse. You'll have one beam running horizontally on top, supported on either side by two A-frame, leaning posts.

My garden bed for the peas was 6'x3'. You'll want to measure the INTERIOR of your garden bed, not the exterior. Because my interior was 6', my horizontal beam was 6'. I wanted the bed to be between 5'-6' tall, so I just decided the legs would be 6' long too.

So, for my bed, I had one horizontal beam bar that was 6', and four A-frame legs that were also 6'. Five pieces total.

However, the question becomes: How do you get the legs to lean against the horizontal bar?
For that, I added spacers. I did that by attaching two small pieces of wood to the horizontal beam's end. I made the spacers about 2.5" long, that way, they would be hidden by the A-frame legs.

You can either drill or glue these pieces onto the horizontal bar (I'm using a thicker bar here than the cedar so I can take photos and hold it easily).
Once you have secured the spacers, you can attach the legs. See how I'm getting the lean I want because of the spacer being there? Remember, the leg width at the bottom does not need to be the perfect width of your garden bed; cedar (and most wood) bends. At this point, I either clamp the leaning wood down and screw it in, or I just screw it in. I use long screws, that way the screw goes all the way into the horizontal bar. You repeat the process with the other side.
So, the end result is that you have your two pieces leaning against the center bar, held into an A-frame shape by your spacer woods.
I should add that it is POSSIBLE to do without the spacers, but I do not recommend it. I tried this technique on one of my pea trellises, and it was not a great experience. You have to leave some screws not screwed in all the way, and the horizontal bar will not sit as nicely. But, if you want to try it, go ahead. My photo is below of my trellis without the spacers, and you can see that it looks a tad more awkward.

At this point, you have a trellis. It's probably a little awkward to move around (I had to pretty much tiptoe through my garden, holding it high above my head). I learned my lesson: build it somewhat near where I want to install it!

It's probably not the most stable either. It may stand up, but you'll need to secure the trellis. If you have raised garden beds, you do this by attaching the trellis to the bed. If you do not, you do this by digging holes, burying the trellis a little, and then putting some rocks around the base.

There are two methods to securing the trellis to the garden bed. You can either drill from the side into the wood:
Or, you can drill from the front into the wood.
If you drill from the front, you will likely need a long screw because you'll have to go through the bed front and the joint and THEN into the trellis. If you screw from the side, you'll have to be a little more precise on your screwing (because the trellis side is only 3/4" thick), but you'll need a smaller screw (1" or so).

So VOILA, you have a trellis, and it's secured into whatever your pea set-up is.

NOW I PAINT THE TRELLIS. Yes, paint does help protect the wood a bit from the environment, but really, I just like the pop of color. A TIP: If you go to Home Depot or most hardware stores, they will have "oops paint." This is where the mixing process did not go right. I get quarts of paint for $1. I don't care if it's interior or exterior paint, gloss, flat, etc. It's cheap, and if it fades, I'll paint it again. I use the oops paint for most of my projects, but this blue on my trellises happened to be leftover paint I had from my chicken coop. :)

After you paint, it's time to string the trellis! I just used cheap string. I suppose you could even use yarn, but you would have to replace the string in a year. Twine would also work.

I just did a zig zag pattern, about 3" between rows. Draw sting across trellis, staple, go up 3", staple, then go back to other side of trellis. Repeat. I tried to keep the twine pretty taut, that way it would be a stable surface for the vines to crawl up.
See, this process is continued up the trellis.
And voila, you have your trellises. I'm pretty happy with the way they turned out. I ran out of space on a few of them, and so I even put twine up the A part of the A-frame!
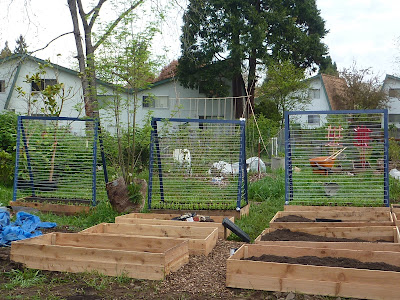
Total cost per frame:
Wood: $2.50.
Screws: about 50 cents
Staples: about 20 cents
String: about $1.00

Total: $4.20 per frame. It probably ended up costing me less than that, because I poked around my toolbox and yard to find the screws, string, and staples. But, if you had to buy things, this is the approximate cost (assuming you have a hammer and screwdriver).

Please feel free to comment if you need something clarified! I tried to make it as clear as possible, though that's sometimes difficult to do.

And note: This trellis form can be used for MANY plants, including beans and perhaps even tomatoes. Beans you may want to run the string vertically though. But the basic idea for the trellis is still applicable!

Monday, May 3, 2010

Weekend updates

*** Note: Tomorrow I hope to post a tutorial on how to make the pea trellises I made. Stay tuned!

This weekend was pretty darn fun. I finished most of what needed to be done. I still need to finish the pergola (not a "needed to be done" project), as well as plant my carrots and fix the onions and basil up with a cover. Oh well. But much did get done.

Saturday, I headed out with a friend to go pick up our wine release. It was a dry Riesling, which is nice, but we do have a lot of Riesling right now. Oh well, perhaps this calls for Mimosas.

It was such a gorgeous day at the winery, and I HAD to take photos.


On the home front, I covered my broccoli with netting to keep the neighborhood and feral cats out. Have I mentioned how much I loathe people who a) let their cats poo in my yard, and b) don't have these cats neutered/spayed? Last night, there was some poor girl cat, probably in heat, and there was meeeeooooorrrrllllll-ing. I feel like Bob Barker: Spay and neuter your cats, people.


Closeup of the broccoli seedings.


The fingerling potatoes are coming out in full force. It makes me really happy. I was a bit concerned, as the yukon potatoes came up first and no sign of fingerling life existed. But now (especially with the rain this morning-- you can really see them), there are MANY little sprouts, and it makes me so darn happy. These are Rose Finn Fingerlings.


And here are the Yukon Gold potatoes. You can see how much bigger many of these are than the fingerlings. I had a right to be nervous... especially with only one bed of Yukons and 2 beds of fingerlings.


The spinach continues to come up!


The project of yesterday: Planting, and then covering with first netting and then plastic, Georgia Jet Sweet Potatoes. They needed to be planted because I got the seedlings. I didn't want them to die as I waited for things to get a bit warmer.

So, I covered them first in netting (again, cats), and then I covered the netting with plastic. Note that the top of the plastic is slanted. That's because we get rain. A lot of it. So far, so good. I had to re-drill a board this morning (yes, in my robe, t-shirt and pajama bottoms), but the slant appears to be working with the rain we're getting right now. If you leave the plastic flat, then the rain will collect on the plastic, and the weight will bring the plastic down, smushing your plants.


The sweet potatoes are very hardy, but they like a soil temperature of 60 degrees. So hopefully, with these cloches, they will be fine. There are right at 50 sweet potato plants. They cover 2 beds fully, and then halves of two two other beds.


The peas are coming in well... particularly the sugar snaps (shown here). Unfortunately, this photo also shows how well the weeds are coming in. That will be rectified in the next few days. Yay black plastic.


The gladiolas are really beginning to come in too. I'm super excited too, because this flower bed has a mystery plant that I saved. I didn't know what it was, but I risked it being a weed and I extended the flower bed to include it. Result? I think it's a PEONY!! More on this as the plant grows.


The garlic is really coming in strong. It's the final push right now!


I side treated all the garlic with blood meal this weekend. It's supposed to really assist in bulb growth, and I really want big garlic bulbs.


The strawberries are very nicely filling in their bed too. There are so many blossoms and small berries!


B sprayed my two roses with a soap mixture yesterday. It's really common for roses to become afflicted with aphids. I noticed some on the berries, so I mentioned the need to spray them with soapy water. B was so nice and did it for me.

There should be more progress from this weekend.... but on Saturday, I found myself with a house to myself, and I decided to clean like a mad woman. Result? I will actually let people into my house again. It is so nice! Hopefully, we can keep it clean and keep up on keeping the floors clean too (a challenge in muddy Oregon springtime).

Friday, April 30, 2010

The power of the GROUND CHERRY

FINALLY, we have GROUND CHERRY GERMINATION!!! Yes, and I love that the newspaper behind this one seedling reads as it does.
Yes, it's one, and it's barely there. But, I'm hoping one showing means in the next two days, more will show too. I need to start another flat of ground cherries tonight too.

There is also basil germination in my 3'x6' outdoor basil bed. This makes me pretty darn happy, since I wasn't expecting much out of this bed until I covered it. Woo!

Next up, we have.... GYPSY PEPPER GERMINATION! Again, totally excited. I have another packet of gypsy peppers coming (I only had 15 seeds for this round), so I want to get those started asap. There are at least 6 plants here.

I had some leftover tomato seeds, so I thought "eeh, might as well start those too." Of course they germinated.

Yesterday, I also discovered new heads of potato sprouts popping up! SO far, only my yukon gold potatoes have shown themselves. I'm still waiting on the fingerlings.

Indoors, my purple tomatillos have sprouted too!

The 3'x6' spinach bed has lots of small seedlings now.

Meanwhile, my older tomatoes are going strong. I need to move them outside pretty soon to harden. I think building my cold frames may be on the to-do list this weekend....

On the to-do list this weekend:
  • Build cold frames
  • Plant sweet potatoes (Georgia Jets)
  • Build netting covers for sweet potatoes, broccoli, and onions
  • Build clear plastic covers for sweet potatoes and basil (may have to do spinach too because that bed is attached to the basil bed).
  • Build shade cover to keep onions from getting too much sun (too much sun= start to bulb!)
  • Side-treat garlic and onions with blood meal (I did this in Feb/March, and my garlic have really thick stems. Here's hoping for HUGE bulbs).
  • Return camillas (poor things)
  • Return pink lemonade blueberries (fail.) and figure out what to buy with store credit from Blueberries. :)
  • Build mobile coop(s?) for a few of the chickens to eat grass in the backyard-- especially for the salmon faverolles that I suspect will always be picked on by the older birds.
  • Finish staining/building pergola if weather permits.
  • Plant (indoor plant) ground cherries and other peppers (if seeds arrive)
  • Paint plastic buckets-- yellow for buckets that will have lavender in them. Red for buckets that will have love lies bleeding in them.
  • Find a few big buckets-- for flower beds. I want something big, for flowers but also to paint as an accent in the one area. Big buckets will add a bit of dimension to the yard.


Thursday, April 29, 2010

Thoughts for Thursday.

Today I feel like my mind is on hyper-drive, so today, I'm just going to write.

Yesterday, I found out I have two sick friends. One has health insurance, the other doesn't. We're talking surgical-measures-must-be-taken-and-many-many-tests-and-follow-ups sick. It makes me worried and thankful at the same time. B and I haven't had any bouts with sickness (knock on wood), but that's something we take for granted at our age. Still, it emphasizes the need to be well, eat well, and (above all) have health insurance. We do.

On the health front, I've been pretty much the same weight-wise. I suppose this is a good thing; no increase is a good thing. Still, I know I could be much more fit, having BEEN much more fit 2 years ago and again last summer for our wedding. Two weeks ago, I began trying to do most of our meals again. I mean, I had been making most our meals, but I was doing a lot of unhealthy shortcuts-- cheeses, the lazy night when we'd order pizza, etc.

But this week in particular, I made a meal plan and I stuck to it. I made it before my shopping trip, so I'd know exactly what to buy. Not only did our food bill go down, but the food was prepared the way I want to eat: Healthily and from scratch. No, I'm not obese. My BMI ranges on the upper end of the healthy range, though, occasionally, it dips one point above. My point is, I am at a point where I can lose healthily and happily and not need/want to crash diet.

And really, eventually I want to have kids... but I want to be healthy and fit beforehand. I know I'll gain weight in a pregnancy, but I don't want to be trying to be a new mom and then also be trying to lose pregnancy weight plus another 20lbs. I hope that having a healthy and active lifestyle before will make it easier to maintain a healthy and active lifestyle after. Yes, I know kidlets tend to wreck havoc on the best laid intentions with the veracity of a tornado, but one can lay hopeful plans, right?

On the job front, right now, we're having to pay my taxes quarterly (since I'm an independent contractor), and that, let me tell you, BLOWS. There's a job I really want in town, but I'm worried I may be looked at as too young for the position. I'm giving it my best shot though. More and more I realize that I need to get a better job. I like the job I have now, but I consistently feel it is just a holding place for something better... I suppose I should feel that way because it IS! I don't see the firm hiring me on as permanent. They need to hire on new blood, but, well, they're dragging their feet on doing so. That's understandable, since it's been the same group of guys for a long while. So, they fill a niche for me, I fill a niche for them. But I want a career, not a niche. Still, this niche will serve me well while I look.

On the animal front, Paddington isn't well. He has sore gums. I thought they were merely inflamed but not bugging him, but then last night he was meowing/screaching/coughing and batting his mouth. I basically sat on him and pried his mouth open, and there was blood. My poor boy. Luckily, I convinced the vet last time I was there (with Rumpole) to give me some more medicine for Paddington in case he needed it. So begins the doses for Pads. He will hate me. But perhaps he will love me again when he is presented with wet food for a week. You can win that cat over through his tummy, I swear.

Last night I found myself thinking about kids. Yes, I would like one, but I also know that we need to wait. But I got depressed thinking about my parents and calculating out how old they will be when a kid is x age. I loved my grandparents (and love my grandmother), and I want my kids to have so much time with them. But then there's the Jess and B need to wait thing. It tugs at my heartstrings. B's parents are older than mine, so there's pain there too. No, they're not sick or going away anytime soon (knock on wood), but of course they will age. I dunno. It's ridiculous to think about because it is really just self-torture.

And then there's B, whom I love so much. As "fit hitting the shan" goes, we've had a lot happen in year 1 of marriage. We're fine-- no worries, but I wish things had been easier so that we could have appreciated each other more. So often, I feel like chaotic situations forced me into a commander position, where I had to be bossy, make decisions, and change things around. Now that we are more settled, I find it hard to relinquish that position, but I'm trying really hard. I wish B knew how hard I was trying. I'm so mad at the various things that have happened to us this past year. I wish I could go back in time and make those not happen so that we could just enjoy being newlyweds without having to deal with so much crud. Yes, it's made us stronger, but it's also made us pretty exhausted. Always having to climb a hill is pretty tiresome stuff.

But I love my life now. Yes, there's the job stuff, above, but we're in a good place, with good people, and a good life. There is baggage from having to sort through all the stuff that happened this year, but it's happening. Strange thing is, I now feel like a newlywed. I guess that's what chaos does.

So that's where I stand. Emotionally spent, tired, frustrated, happy, and worried, searching after the elusive "satisfied." Once in a while, I get overcome with this feeling of "all is right with and in the world." That's been coming more and more often, so hopefully, I'm on the right track.