Monday, October 31, 2011

The transformation of the hall closet (yes, another closet redo, but this one is cooler)

So. We have this hall closet:
It was a very awkward shape--- about 3' deep, 18" wide, and over 6' tall. It had 6 shelves, and all were slanted so that the front edge was slightly higher than the back.

Weird.

Saturday morning, I was finishing my organizational binge, and there wasn't much left in this closet. What to do with the space?, I wondered. It was time for my neighbors' pumpkin get-together, so I headed on over.

There, I met former owners of our home, two owners removed. They informed me, amongst other things, that owners before them were proprietors of one of the nice wineries nearby, and that they had used the closet for wine storage.

Ah ha! This explains the dual vents, the crazy insulation, and the tilted shelves!!!!!!

Our wine, though in a tall, nice rack, was a) incomplete since 20+ bottles were too big, and b) was getting too much sun. Bob and I had been discussing moving it for some time. So, I decided to use the closet!

CLOSET REDO!!

The first thing was to add more shelving (since we only wanted our bottles to be two rows stacked, at most, per shelf). This meant also moving around the existing shelving and buying/cutting more shelves.


Then the room got painted. I should note that right before this, I sprayed the floor vent a brown color, and the ceiling vent a gray color, that way they would blend in a bit better.

I also muddled together enough flooring from our last closet project to put in wood floors, and enough molding to install baseboard molding! There was barely enough padding to go under the floors too!

Proof of the gray-spray-painted vent on the ceiling (much better than a dingy white).


A close-up of the floor and the brown-spray-painted floor vent. The vent was not lined up well with the door, so I figured out that I could cut the hole in the flooring square-on with the door and make it look like the vent wasn't so uneven. I think it worked, without blocking the vent.


Then it was time to install the shelving (painted white, though I might eventually redo this).


And, after a long, arduous process with my labelmaker (those are Winery/Year/Type labels on ALL THOSE WINES), I sorted the wines and put them in the rack!


There is a large shelf on top that is open for whatever we want (probably old towels since we often need those handy) and the floor shelf is open for a box of bathroom items.

Pretty darn nifty, right? It was a lot of work, but it was totally worth it. Climate-controlled, well-organized, and properly-stored wine!

Sunday, October 30, 2011

Stained glass window-- finally hung!

I finally hung the stained glass window in the dining room. Remember, this was the window that was bought for only $20 at a secondhand store... and I was shocked that it fit our window PERFECTLY when I got home.
And now that it's hung, I am still shocked. I've painted the frame a glossy white, and it goes perfectly with the window frame. It looks like it was made for/original to/commissioned for our house.

It's rather shocking. I mean, it's perfect. It fits within a 1/4" of the window edges (not the frame edges--- the glass edges!). Perfect fit.
I love the addition.

Friday, October 28, 2011

Major Closet Redo

This is our beautiful dining room closet now:
And this was it before:


Ok, that photo was from mid-July. In late July, I did a closet reno on this SAME closet. I took the dowel rod and moved it deeper into the closet under the stairs (so we could use the rest of the closet rather than just have a dowel in there. I also painted the whole room in a tan, including under the stairs.


I remember being very proud that we could now also store our vacuum machines in there. AND I bought a small, 6-drawer unit for various items.

Well, count forward to October. The closet was a mess. The drawers were great, but they got overloaded with stuff on top and then you couldn't make your way to the coats. The vacuum in the closet was a bad idea since it was way too bulky. Plus, with the new robot vacuum, we don't use the old vacuum much and it now lives upstairs.

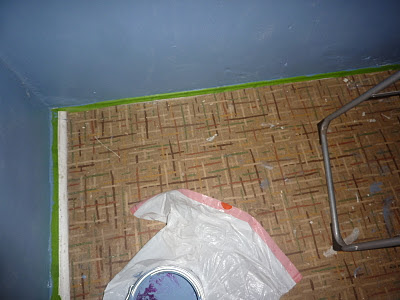
And UGH, don't get me started on the old linoleum. DISGUSTING.

WHAT I DID:
  • I painted the walls using paint we already had.
  • I took out the molding in the closet and put in new molding that I had found on the street, leftover from someone's home project.
  • I had a $20 credit at the recycle store, and there, for $20, I found a box of REALLY nice hardwood flooring (like a $200 box!). Since the space was small, all I needed was one box, so this worked really well.
  • I moved the 6-drawer unit to under the coats, and it works perfectly there!
  • I took down the old hooks and put new ones up in a spot more convenient and not in the way.
  • I labeled (with the new labelmaker) the 6-drawer unit: 5 drawers dedicated to winter-wear, one drawer dedicated to dog stuff (leashes, brushes, etc).

And voila:

The dowel is still in its late-July spot, but now, the drawers are underneath it. I should add that there's enough room next to the unit for the large umbrella and the yoga mat.

The hooks are along the left-hand wall as you walk in. We used those hooks at our old apartment and so I repurposed them and used them in the closet. They're very nice hooks, so I'm glad they worked. I've promised to only keep my current purse on the hooks and not use the hooks for purse storage.

The wood floors are WONDERFUL and were so easy to install (50x easier than the linoleum I just finished installing upstairs. Yes, I'm questioning myself, but then I remember the cost and I stop questioning). The molding job, while not perfect, is DARN good enough, and I love the blue/white/wood contrast. We're doing this same color scheme in the laundry room, so I'm really glad it worked here.


So, that's our new closet. Yes, I installed wood floors and revamped a closet. But, it makes us RIDICULOUSLY happy, so it was well, well, well worth the effort.

Tuesday, October 25, 2011

Labelmaker acquisition!

Guess who got a labelmaker! -->this blogger<-- !!!

This is very exciting for spice and drawer and kitchen organization purposes.

And, last night, it was sufficiently tested.
SAUSAGE!!!

Not her real name, but totally appropriate while cannonballing a wriggling, gleeful corgi onto the bed. I cried because I was laughing so hard.

Monday, October 24, 2011

Freshly-painted front door.

We needed to paint our front door. After slapping a sample color on it a few weeks ago (French Dark Chocolate by Glidden), I really needed to get around to actually painting it. And: Voila!


Here's the obligatory "before" picture: A faded grayish blue with no gloss. Also note: The hardware on the door didn't match the hardware before, so there was a bare spot AND a small hole. This was courtesy of the prior owners, and it was driving us NUTS. You can see the sample new color in a section on the top of the door.

Yes, much better. It also has some gloss to it too (sprayed on afterward), so that's nice.

I also treated the stoop. Now it's durable, a good color for not showing too much grime, and looks purdy.

We had though about stripping the front door down to the wood and then treating it with a cedar stain. We're suckers for craftsman doors. But, we found out from a neighbor that the owners two owners ago had tried that, and the door began to deteriorate. Had to scrap that idea. When I took off the kick plate and the grate bottom, I realized that the door is not the greatest-- lots of water weakening. The door is still solid, but in a few years, we'll (aww shucks!) have to replace it with a prettier door!

Sunday, October 23, 2011

Right now.

This is going on right now in our bedroom. Yes, really.
She's not really wet anymore, so we let her out of her jail in the kitchen. The dirt is caked on and the result of an afternoon of playing in her pool and then in the dirt.

Saturday, October 22, 2011

Our new UPSTAIRS!!

The flooring and walls upstairs are FINISHED! Ok, I still need to do floor molding and do some touch-up work. There's also the issue of building a better sub-wall around the stairwell. But that can be done. For right now, let's focus on the floors and walls and look at the improvement!

Here's the before. Ignoring the corgi carnage, there was bad, yellow-painted, 70's paneling. The flooring was stained, old, industrial carpeting. To make matters worse, the padding under the carpeting was hit-and-miss. The worst part was the sub-floor: Particle boards of varying thickness (so an uneven floor) that was nailed directly on top of the old floorboards. It was a LOUD floor. If you walked upstairs, we heard you downstairs. Especially when laundry was being done. Oy.

Here's the after! New flooring and we sprung for rubber, noise-reducing pads under the new floors. It's quiet. The walls have been patched of holes. The trim has been removed. We kept the paneling (for now; we may get rid of it in a few years), so I patched all the lines on the panels so the panels looked flat. Then I added texture to the walls using Behr's paint texture. Finally, the walls were painted in a light cream color. Two small walls on the other side of the room (in the laundry area) are painted blue. Any trim in the room is white.


The laundry area was a similar situation noise-wise. But, instead of just particle board, we had: Linoleum, glued to plywood, nailed to particle board, nailed to the subfloor. NO PADDING. It was loud, even with the quiet, modern machines.

And now? Oh-so quiet.

More photos to come as we finish up the upstairs, but I thought I would at least post, finally, the major improvements!

Wednesday, October 19, 2011

A new alarm clock.

The last couple of mornings, Bob woke up to dogs. By the time Bob's alarm clock goes off, I'm already up and about. Bailey's taken over my spot in the bed.

And then there's the corgi.

I plop Mads on the bed, and she bunny hops over to Bob and flings herself on top of him like a beached whale. If he peeks down at her, she rolls off of him so she's next to him, upside down, all paws in the air. And, if he says anything, she licks him on the cheek.

No joke. It's a pretty nice way to wake up.

Tuesday, October 18, 2011

Frame wall complete (for now)!

The frame wall is finished (for now). There is some space to add more photos, and some photos will be swapped out when we get other photos. But, I'm not touching it for at least a week or two! Here's the final product:
If my counting is correct, that's 41 frames. Doesn't look like that many initially, does it? I'm not entirely happy with the cluster of four in the upper right-hand corner, and I left space for a few more photographs on the bottom right. But oh, it feels SO GOOD to be done. It's a mixture of family, pets, and art, with a few others thrown in. Only two frames have nothing in them, but they're really small and will soon get filled in.

More on how the wall came together in another post, but for this one, I just wanted to post the progression of the wall:

From an empty space to having the new sideboard:


Then the sideboard decided to get festive (it's still festive, but we've spread the festiveness a bit more around the house):


The wall, partially through (though I moved some of these photos around and reframed one piece of art):

To the (mostly) finished piece:

We love it!

Sunday, October 16, 2011

Morning wreath project

Just a quick wreath project this morning. Very fall-ish and a nice pop of color. It was the husband's idea to add the flowers for "an extra pop of interest." I think craft projects are rubbing off on him. Victory!

Saturday, October 15, 2011

Never mind on the hanging thing...

So... Four hours ago, I posted that I was going to hold off on hanging the photos.
Clearly, I lack self-control.

I also realize that I will need to vary things up with this next hanging (I see several pairs of horizontal 2s, so I'll do some varying in this next round).

Frame wall progress

Eleven frames are done for the frame wall! I've been SO tempted to put a) color photos in and b) put them in without matting, but they do look so much better with both those things that I'm trying not to capitulate.

First up: A print we've had forever, but never found a frame for it. Now we have a frame AND it's double-matted!

Remember that stamp frame? Here it is with the same matting and frame painted, holding our wooden wedding invitation.

I went out and scanned old photos that were in color, and I came back with 12 5x7s and 4 8x10s. We also had 4 photos that were already in black and white. Artwork+ letters + photographs: I think we'll have a full wall.

Here is the final frame of Shirley and me riding in 1990:
And Bob's dad washing his dog:

Another artwork piece, this time by Noelle Dass:


Bob's and his sister when they were children:

Wedding photo:

Bailey pup photo (I LOVE this photo):

Bob's parents:

Bob's grandparents:

And another art print!

Whew!

And yes, that's only 7 photos... and we have 20 (at least) total. Much more work to do.

I really want to start hanging, but I think I'm better off to wait until after everything is done so I can arrange things on the floor first and then hang. And, I still need to fix up a few prints with better hanging equipment. We plan on hanging each photo with a nail and then use one of the picture frame velcro strip thingies to keep each picture even and aligned.