Tuesday, November 29, 2011

Desk Acquisition and Transformation

Our newly blue room needed a desk. After a search of what was available, I was pretty much resigned to building a simple desk using either a finished tabletop from Home Depot or finding a tabletop from the reuse store. I'd use our filing cabinet as one "leg" and attach the other side to the wall. Not very flashy, but it'd do and do well.

But then, the very day I finished painting the blue room? I found the perfect desk. We wanted long and narrow. We wanted it to be 5-6' long and 18"-24" wide. This desk was 5' long and 18" wide. Whoa. We also didn't want it to have too many drawers, since we knew those drawers would soon get cluttered if we did.

So, without further ado, here is the desk, as it looked when I lugged it home in my car. Oh, and I should add that it was ONLY $25!!!!! Swoon.

The desk used to be a vanity, many years ago. We love the legs and the lines. It's a very beautiful piece. The beige paint though... not so beautiful. But before I go into how I tackled the paint, I'll first show off the desk a bit.

Two small drawers on either side:

And, my favorite part: The center portion of the desk lifts up to reveal a center compartment and a mirror.


However, the beige paint had to go. It was too thick to easily take it off and refinish the desk, so I decided to sand and paint the desk a glossy white. But first, I had to remove the drawers and lid of the desk and sand down the painted portions.

The center lid got painted separately:

And here's the main desk portion partway through!


Finally, the desk got moved up into the office. I think I'll eventually add handles to the two drawers, but they each have a curved side, making it very easy to open them even without handles.
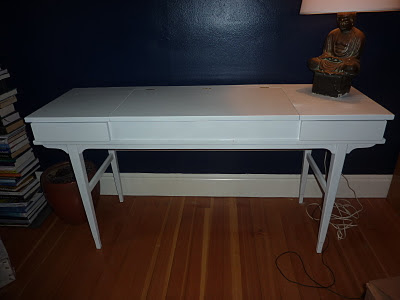
I'll need to add liner to the drawers. I was a bit unhappy that I got paint on part of the inside, but this is not the end of the world, and I will probably be the only one to ever be irked by it.


And I do swoon over the center console portion. I think I will be reinstalling the mirror too. It doesn't hurt anyone, and it's just so nifty!

(I apologize for the tilted shade; It was hitting the wall and I didn't realize!) I do love that our Buddha lamp has a perfect home on top the desk. It is very calming and beautiful to have it there.

Ahh, and our next project: Refinishing this file cabinet to match the desk. We'll likely use the same hardware on the file cabinet as we eventually choose for the desk. The fish (used to house spare change) and succulents normally live in the living room, but they've been shipped off to the office while Christmas decorations take over the rest of the house.

So that's our desk! We're still astounded at the price and how perfectly it fit our room. I guess sometimes you do get what you need!

Monday, November 28, 2011

Birthday boy and muddy bed

One year ago today, this little furbaby was born. Now 75 pounds heavier than he was in this photo, he's still our lovable, lovable, gallumping elephant of a lug bug. Such a happy happy boy.

"I am in your bed, getting it all a-mucky!" Yes, that's the corgi, making herself comfortable on our bed. Those little legs have some spring.


Sunday, November 20, 2011

I'm blue for you, blue blue blue blue blue!

We went blue in the office this weekend. And, we're ecstatic for the results!


It was a plain, light beige before. That's all well and fine, but you couldn't really see the trim/molding details. Plus, unlike other rooms in the house, there were no coved ceilings, so we could go bold without having to take it to the ceiling.

So we did. And yowza! We like the results. And so, without further ado, here are the before/after pics. They are only the paint before/after. Decorating details are soon to come in a future post.

Boring corner before:


And boring corner after! Taking the photos at night produced a reasonable blue. The real blue is a bit darker. I know the quality is poor, but indoors, during rainy, dark, outdoor weather in the Pacific Northwest= very little natural lighting. But, I think you'll still get the picture that it's a big change.


Doorway and partial closet before (ok, with a small area painted... I literally dropped the paintbrush and ran for my camera when I realized I lacked "before" photos!):


After:

Closet and windows before:

And after:

Other semi-boring corner before (complete with the husband's goofy sign):

And after!

We're pretty darn happy. And now we get to fix it up. Wait until you see what we found!

Such a big change from yesterday when the room contained:
* All the stuff to go into the room
* Over six bags' worth of stuff to be donated (we'd been gathering up for a while)
* All our Christmas presents we've already purchased (yes, really. I'm on top things this year)
* A box of dried lavender
* Four boxes of various appliances that we needed to decide to keep or chuck
* Three other large boxes that needed to be collaped into recycling
* Ten cans of paint from various projects
* Three huge boxes of house project stuffs
* A stack of frames (for the office)
* Two lamps
* Three piles of laundry (all nicely folded... but still, not put away)
* A toolbox
* Two backpacking packs and one large gunnysack full of camping gear
* A yoga mat
* A sleeping bag
* Three empty canning jar boxes (collapsed into recycling) and three full boxes of canning jars.

Yes, it was a total and complete mess.

And now? SO MUCH BETTER. Slowly but surely, everything in our house is getting a home.

Saturday, November 19, 2011

Room update.

Well, the first coat is on, and a second coat is on in some spots. We ended up going with "Midnight Sky" by Behr, but don't look up the color because the online color swatches do not do it justice. It's a rich, dark, navy blue.

The icing on the cake came this evening when Bob put one of our chairs in the room. BAM. Dang it looks swell.

It's all very exciting. The office has been neglected for quite a while.

Office paint job.

We're seriously considering doing this to the office today:
(via Pinterest).

Yes, a navy blue.

And hey, if we hate it? We can repaint. But, we've mulled over this one for a while and we're going to give it a go. I think. I have to clean the joint first.

Thursday, November 17, 2011

Kitchen Wall Quote

I love this quote by Luciano Pavarotti: "One of the very nicest things about life is the way we must regularly stop whatever it is we are doing and devote our attention to eating."

I think it very nicely sums up a lot of things... festive holidays, friend and family gatherings, the delight over a delicious, well-cooked meal, and how, no matter the chaos of the day or distractions of modern-day life, we still have to settle down and eat. It also reminds me that I'm pretty thankful for the lifestyle we have and that we do have food to eat.

So, when it came to our kitchen, I wanted to put this quote on the wall. I looked into vinyl wall stickers, but not only are they pricey, but I couldn't find one large enough. I decided to do it myself instead. Here are the results!

Here's how I did it.
1) I picked a font I liked and put the quote in that font. Bob approved.
2) I made the entire quote, in the font I liked, into a PDF.
3) I pasted that PDF into Excel, which will let me blow up an image to multiple pages.
4) Using print preview and the size ratio adjuster, I blew up the image to my liking, and printed it out. Bob gave the thumbs up.
5) I pieced the image together and hung it on the wall where we (yes, we, not just me) decided to put the image. This also allowed us to test where exactly to hang it without having to commit to sticking it on the wall there:


6) I then traced out the words. Here's the result halfway through.


Wondering how I traced it? I used a trick I learned from my (genius) friend Natalie over at Almost Never Clever. Going one word at a time, I cut the word out of the overall quote (being sure to know where to put the word back so the quote stayed aligned).
I took the cut word and I shaded the entire back of the cutout with a pencil. I then taped the word back on the wall (in the correct spot) and outlined the letters. The shaded back meant that when I outlined, it left faint traces of the word on the wall. So, when I removed the cutout again, I was left with this:
That permitted me to go back over it with a black sharpie, which gave me a lot more wiggle room when I finally painted in the letters in black. I love Natalie's trick-- it's cheap carbon paper (and really, where can you find carbon paper nowadays?)! All my letters and words transferred over without any problem.

With the letters (finally) all transferred over to the wall, I was left with this:
So, 7) it was time to paint. I didn't need much paint, but I needed black paint. So, I went to Home Depot and got a sample-size of paint (on clearance!) of eggshell Martha Stewart, but tinted to Behr paint's "Mickey Ears" color. That was the blackest black I could find. Total cost? $1. And really: that was my only cost for this entire project (besides my labor hours!).

The sharpie black outline really was a blessing. I could be more quickly precise with a sharpie than a paintbrush, so, while I could have done without the sharpie, the sharpie made the process go a lot faster.

So finally, voila. The quote is on our wall! We did have to keep the golden retriever out of the kitchen if there was any wet paint-- we didn't need that tail swatting wet paint around.

Yes, it's on there permanently and vinyl wouldn't be permanent. But, we like the quote enough that we expect it to stay up there for years, and, for that amount of time, vinyl would likely create a shadow (from fading) on the wall anyway. Plus, this was exactly to our liking and we won't ever have any peeling (hey, it's the kitchen-- the wall could have gotten wet and we could have had peeling vinyl!)

So, long story short, we love our new wall and our new quote. It was easy and very custom-tailored to us... because we did it ourselves!

Tuesday, November 15, 2011

Window, window on the wall.

A while back, I mentioned we bought a vintage, 6-pane window. It was inexpensive; on sale at the nearby recycle store. We wanted to use the panes as a dry-erase board (you can do that on glass). I initially painted the old-looking pane blue...

But that didn't really float my boat. I think part of the problem was we left the panes clear. So, I painted the entire back white (including the panes!), and painted the front (covering the glass on front) a orangy red color called "Paprika."

And, it is now finally hung in our kitchen:

It took me a while to figure out how to hang it. I was just going to wire it, but that's a pain and relatively unstable. We needed stability if we were going to use this sucker. So, I ended up getting eyehooks and bathrobe hooks. That works perfectly! And, if we ever need to take it off for a bit, we can easily unhook the entire thing (not that I plan to).

And yes, I do love how you can still see the old crackles from the old paint. This is an example of how my laziness--- in not stripping the unit of old paint--- is a good thing.

The kitchen is slowing coming together. It was already a pretty "together" kitchen, but now we're beginning to add some touches. This is one of them, and we both like it!

Monday, November 14, 2011

Yes, I married you.

Bob's computer: *Chirpy weird noises and giggling*

Me: What are you watching?

Bob: An emu versus a kangaroo!!!!

What's your beef?

Well, we know what ... or should I say WHERE our beef is!

It went from in my trunk...

To a then-almost-empty freezer...
And voila! From left to right: Steaks and ribs/ chicken, pork loin and pesto/ roasts, soup bones, and dog bones/ ground beef.
This is the result of us buying a half-share of beef from a local farmer. He only had a herd of thee (this was no feed lot), and each one spent its life eating in a nice pasture, on organic grass.

YUM. And, what's extra neat? The flat rate per pound was cheaper than I could ever even find ground beef at the store. And, I know that all this meat came from ONE ANIMAL. No weird cross contamination. It's especially nice with the ground beef. The meat in one of the one-lb packages? Came from one animal, rather than possibly hundreds.

Nice indeed. We support our local farmers!

Cat Cupboard Completion.

This new cupboard now lives upstairs. Sorry for the poor photos, but we have lacked good natural lighting for a while now with winter settling in up here in the Pac NW.

It's cute, painted white, and has small plant etchings/carvings on the front (not too many, just the right amount).


But, there is a reason why the cats love this new cupboard... (case in point, Paddington posing...)


It still needs two new knobs... and a patch job for where a key used to be used, but let's ignore that for a second and focus instead on the utility of the cupboard.

It houses the new cat box. Applause. We wanted something small and compact, so we opted for this $9.99 cupboard from Goodwill. I fixed it up with new paint, and cut a hole in the back for the big bin. With our slanted ceilings upstairs, I knew we could have the bin sticking out in the back and still have it be relatively hidden. We've trained the cats to go in a cupboard thing a long time ago, but it was pretty big and not great at keeping the mess down.

The new box? It's a big rubbermaid container. 1) Easy to clean, 2) DEEP (to keep pawing cats from kicking out litter), 3) Easily replaceable if it gets gross, and 4) IT HAS A LID-- on top of which we can store the scooper, if we want. Success on all accounts. I have a mat that will go in between the box doorway and the cat doorway, to hopefully catch the occasional litter piece.

I cut a small outdoor hole for the cats to get into the cupboard. You can also see where I built a little stand for the back of the box where it sticks out. But, given the slant of the ceiling? It's not very noticeable (unless you squeeze into the back area where I was to take this photo).


So yes. It's the new cupboard upstairs.

It's a bit of an experiment (smell and mess-wise), but a very inexpensive one. Here's hoping!

Monday, November 7, 2011

Another closet redo-- this one is personal!

I know. I've been on a closet redoing kick recently. First came the dining room closet redo and then our new wine closet. Well, with all those recent closet redos, I had to ask myself why I hadn't tackled the closet used the most by me: MY bedroom closet. Bob has his own, I have mine... and mine was not hacking it. It wasn't really my fault... it was the closet set-up. I also decided that this closet? It would be an almost FREE REDO. I was headset on doing this as cheaply (but having a nice end-product) as possible.

I focused on the standing closet portion. This part is a true closet: Door. Rod. Shelf. Now, next to this closet there are two built-in drawers and two, large, built-in cabinets. Those I'll tackle later. I really only use the two drawers, so I have to think awhile about the cabinets.

So, here are the embarrassing "before" photos (and I removed some of my hanging clothes before taking these photos):


And, oy, the shoe situation. What a mess.

The top shelf was so high that it was above the doorframe, making it really hard to access and to get stuff up there. As a result, it was a mess.

And now, I'm much happier to share the "AFTER" photos!
Left side...
Right side...

Breathe a sigh of organized relief.

The room was painted with leftover paint from the other closets and upstairs. Shelves were put in. Organization occurred. And a light (ooh, a light!) was placed on the shelf. Swoon.

I did a number of projects which I'll expand upon sometime soon. One of them is my new necklace organizer (again, all using items I already had):

Another project (also using items I already had) was the hanging earring holder:


Had to drop in a photo of my new hat (purchased almost for free with a discount and another $$ off coupon this afternoon, woot! LOVE it.):

And also had to point out what I used to display it: One of my blue candleholders (maybe it won't get animal fur on it this way)!


There are three shelves on the left-hand side, constructed with leftover scraps from building new slats for our bed and building new front stairs. I then covered them in leftover flooring from upstairs.


The mirror, I already had (and, actually, it was free because I traded some items for it at a vintage store):


I reused hooks that we had from our last home to hang my bags and purses high up on the right-hand side. They're out of the way, but, yet, easily reachable.


The hooks also hold my "fun-to-wear-but-difficult-to-store" sunhat.


I reused the top shelf and covered it in flooring too. I just moved it down about 4'. Nice. I have plans on putting trim or tile on the outside edge of the shelves... but I haven't yet. We'll see.


All my stud earrings, pendants, metal chain necklaces, pins, and watches are all in my inlaid boxes (I have a small collection of Syrian inlaid boxes):


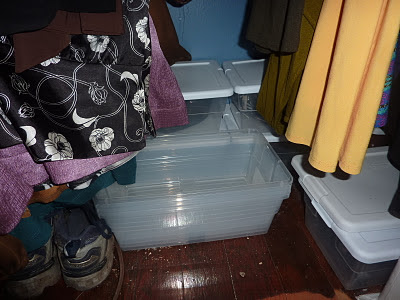
We have a hallway shoe rack for most of our everyday shoes, but my less-used pumps and boots cause a headache for organization. So, I bought clear plastic shoeboxes.


And, finally, I reoriented the closet door so it opens on the side that makes sense:

So, this is my new haven. I love it. It makes me so happy! I've also found that the nicer and more organized a space is, the nicer I keep it. So far, that's true with this closet!

Total closet cost (hat not counted): $2 for a brand-new reed scent diffuser. The closet now smells like vanilla sugar cookies. A very well spent $2.